Category Archives: Recording

DIY Add Line Out to Your Guitar Amp
DIY Add Line Out to Your Guitar Amp

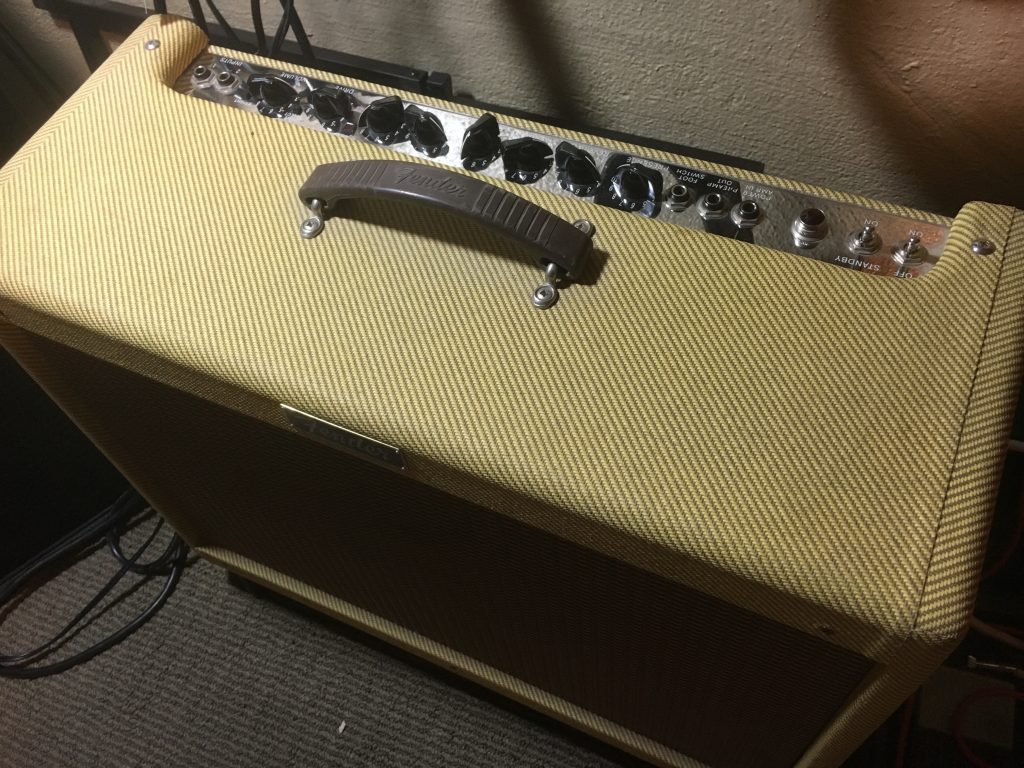
IMG_3226
Fender Blues Deluxe

The Problem: you want to tie your guitar amp into the sound system, but your amp doesn’t have a line out.

A friend of mine has a Line6 Spider IV 120W with no outputs other than the speaker and headphone. We looked at hacking the headphone out, but decided not to carve into the brand new amp as it would require cutting the circuit board. The solution: a direct box off the speaker.

What’s a direct box?

A direct box is simply a transformer.  It usually has a high impedance side with a 1/4″ jack and a low impedance side with an XLR microphone cable for balanced signals.  Normally they are used for small signals like an acoustic guitar pickup or a speaker (or computer) line out.  They can also be used to large signals if you cut the signal down to what your sound board is expecting.

Danger!
Direct boxes exist with a “speaker” level switch which provides 20dB of attenuation and a GND lift switch to disconnect the input ground from the output ground.  One of these boxes could do the job correctly if all the switches are set correctly.  But, modern bridge drive solid state amplifiers (such as the Line 6) could be shorted out and destroyed if the ground switch is in the wrong position because they might short one side of the speaker to ground.
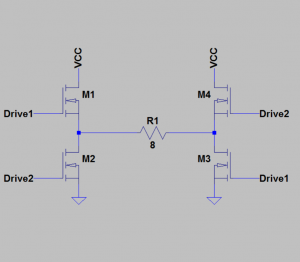
circuit-sim
H Bridge Circut

A bridge drive works by driving both sides of the speaker so that one goes up while the other goes down,

If you connect either side of your speaker to ground (like through your direct box), you short out one side of the driver and will likely damage the amp.

More Danger!
The signal on the 8 ohm speaker for 12W (half volume for our Spider IV) is 9.8V peak which is a wee bit high for the mixer.

We want to cut that down to 1 V (-20dB) so we put a resistor divider in there. Also, we add a series resistor to bring the resulting output impedance closer to the 600 Ohm standard for balanced line mic cables.
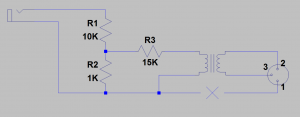
directBox1
The direct box schematic

The exact attenuation isn’t important, so I used easy to find resistors to make a divide by 11 circuit (-20.8dB). A true divide by 10 would use R1 = 9K.

If you are interested, the transformer we are using has a 6:1 turn ratio and the output impedance will come out about 440 Ohms which is close enough to the 600 Ohms.

Build it:
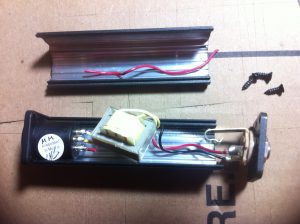
I didn’t want to throw away any expensive features, so I bought a simple direct box: RapcoHorizon DBBLox.  The only modification needed is to remove the ground wire and add the resistors.

IMG_1980

I cut out the wire from pin 1 on the XLR connector.  The connectors themselves are mounted in plastic panels so they are already electrically isolated from the chassis.

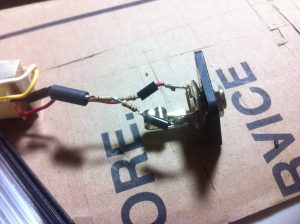
Then I inserted the resistors with some heat shrink to cover them and keep the contacts from hitting the metal housing.

IMG_1982

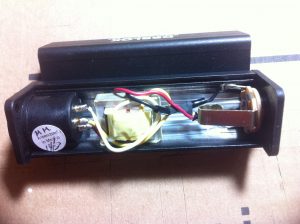
Last put it all back together. Keep the wires for each side of the transformer wrapped with themselves as close as possible – this picture shows the black and red separating a bit too much. The direct box will be prone to some hum and keeping the wires together will help.

IMG_1983

Next you need to connect it to a speaker. You need to use a shielded cable for this part so I used the good half of a damaged guitar cable. I crimped a quick disconnect onto the center conductor and rolled the shield together for the other connector (insulate with heat shrink). Leave enough lead length to hit the spare speaker tabs on your amp.
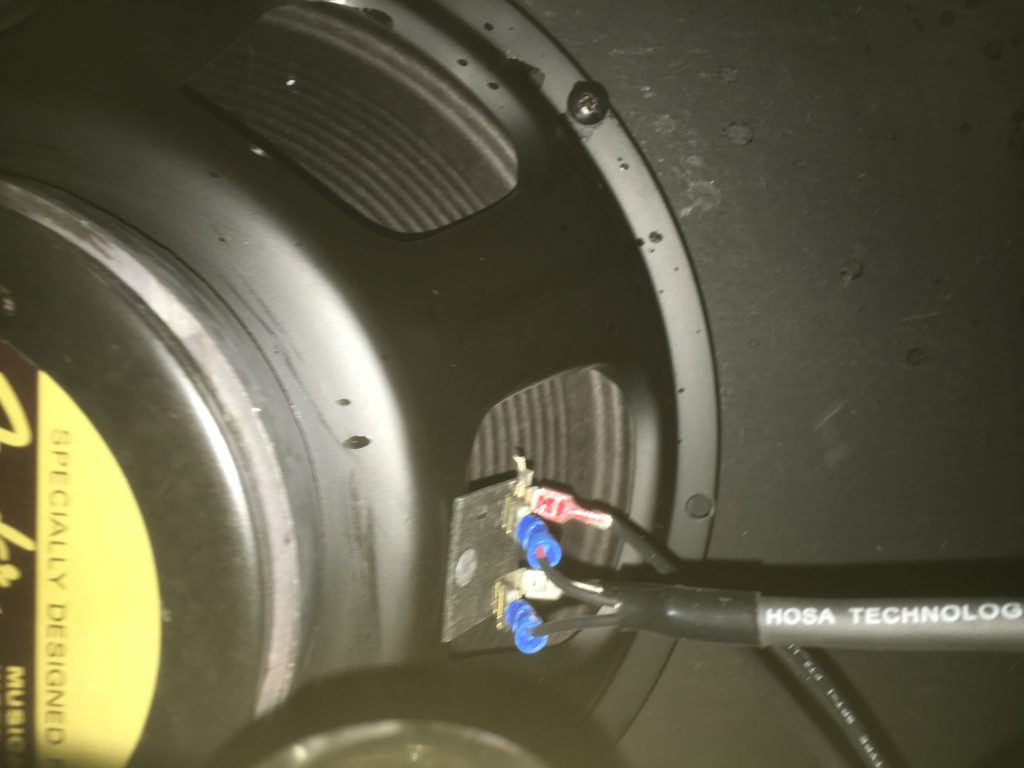
IMG_3219
Connect to spare speaker tabs

That’s it!  Connect it up and give it a try.   I started at low volume to make sure the levels were good and nothing had gone wrong.  Eventually I will velcro it into the back of the cabinet so I don’t have to go hunting for it.
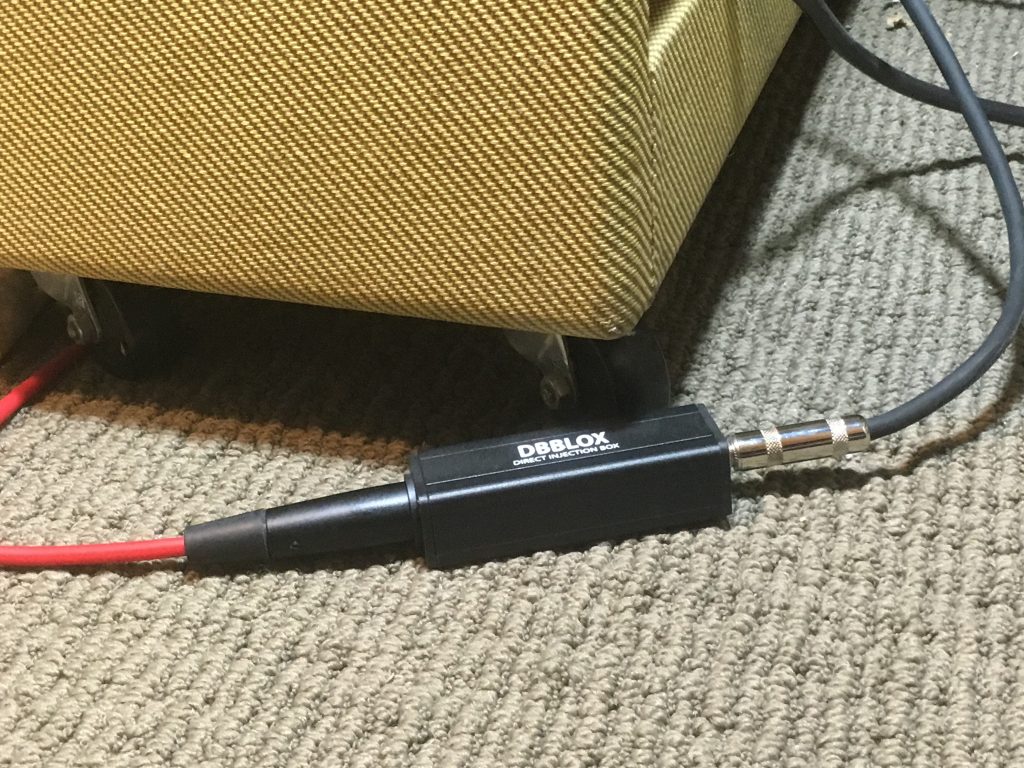
-20 dB Speaker Direct Box Connected between console and amp
Connect it up


Repairs

Label it!Label suspicious equipment or put it in a repair box. It is better that good equipment goes into the repair box rather than bad equipment going back on the shelf to haunt the next guy.

Label unusual equipment as well. The third time I received an active direct box for repair I put a label on it to check the battery before use. It has miraculously worked ever since.

Guitar and Instrument Cables Otherwise known as 1/4″ phone plugs. These cables are made from coaxial cable and are always wired tip to tip, shield to shield. Common failures are for the shield to break loose resulting in horrific buzzing. 
tswiring-big

Speaker Cables

Speaker cables are usually a pair of heavy gauge conductors wired to 1/4 inch phone plugs or to Neutrik SpeakOn Connectors. Usually the Neutrik connectors will be the NL2FC two pole or NL4FC 4 pole. Refer to the Neutrik site for specific assembly instructions of their connectors.

Polarity on speaker cables is always tip to tip or Positive to tip.

As smaller speaker cables can be confused with instrument cables it is good to label them. For heavy gauge speaker cables look for over sized 1/4 inch connectors designed for larger cable.

Parts


Connector and cable parts are available from a variety of sources including the following (in no particular order):

XLR Cables
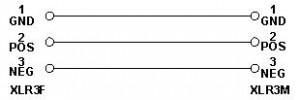
xlr3f     xlr3m
xlr3wiring
XLR (standard mic cables) are wired pin to pin straight. The most common problems are broken solder on the wire to pin connections inside the connection or fatigue and breakage at the end of the strain relief as indicated by the green arrow below. 
xlr3f-side
Any cable or power cord that gets bent repeatedly will break. Avoid winding cables tight around anything and discourage others from it because those cables will fail.

Microphones

Microphone Selection
There is a lot of material written about microphone selection. In particular check Shure microphone Educational Publications.

I have only included the most common options here.

Microphone Type:  The most common mic types are dynamic and condenser.  Dynamic mics tend to be less expensive and more durable than Condenser mics.  The trade-off is they typically don’t sound as good.  Condenser mics are prone to moisture damage, physical damage, and require a power supply (usually phantom power).    Both work well in different situations.

Microphone Pattern:  There are three basic microphone patterns – Omnidirectional, Cardioid, and hyper-cardioid.

Ominidirectional picks up sound from everywhere around it regardless of where it is pointed.  These are quite good for choirs and public speakers.

Cardioid mics are the standard stage mic.  They pick up in the direction they are pointed and DON’T pick up in the opposite direction.  A vocalist on stage points the microphone at themselves and away from the stage monitor and magic happens.

Hypercardioid mics pick up even less on the side.  The drawback is they begin to pick up directly behind them.  Point these mics so that they are pointed about 120 degrees away from the monitor speakers.

Frequency Response: Vocals and most instruments rarely go below 100Hz. Bass, Bass drums, low winds and piano (and pipe organ) are about the only instruments you need for low frequency. Most low instruments will just sound thin if recorded with a traditional mic lacking lower frequencies.

Vocal mics typically have some boost in the 6KHz – 8KHz region to make the voices more crisp.  Instrument mics and recording mics are more typically flat frequency response.

Microphone Position
Correct microphone position is more art than science. For the different pros and cons of mic placement I will refer you to external sources:

Bartlett AudioLots of great detail on mics in different situations

Shure microphone Educational Publications.  Many documents on different techniques and applications.

Guitar Mic Example: My own demo with surprisingly dramatic results


Acoustic Guitar Mic Example

One of the best tutorials I saw on micing had recordings of several different guitar mic positions. Since I couldn’t find it again to give credit I will attempt to reproduce it here.

Mics at 90 degrees halfway between the sound hole and the 12th fret.
90deg

mics about 8-10 inches off bridge and 12th fret.
bridge-neck

One mic about 6″ above the 12th fret pointing down, the other about 15″ from the sound hole.
topandfront

Home Recording Studio

A home recording studio might mean anything from a computer with a USB microphone to a garage full of racks of equipment.

Getting the sound in
Face it – most home studios are based on one person recording one instrument at a time. You can do this for fairly low cost ($100-$300) if you already own a computer.

Base system 
Most computer sound cards are pretty good. If your soundcard has stereo line in (some laptops don’t) then usually the only problem is noise (hiss) as the frequency response for a sound card is pretty easy to get right.

With a good enough sound card – you are ready to connect keyboards/synth and drum machines right up and use software to track them.  USB mics and USB MIDI controllers can solve these connections for low dollars.

Audio Interface 
I’m a big fan of a dedicated audio interface and traditional microphones.  If you want to use microphones you will need a mic preamp. Microphones put out very low signal and your computer expects about one volt RMS for full volume.

You can use a computer audio interface or a standard mixer for this job. Be careful of low cost (<$250) mixers as they may add noise.

you can get a real nice USB mic interface with phantom power and a mic preamp for about $100 (Macki, Presonus, others).  If you budget $50 for a mic (and cable and stand) and $100 for some quality headphones you just built a recording studio for $250.

A little more advanced is a Mackie ProFX8v2 8-Channel USB mixer ($230) with 4 mic inputs.  Be aware that you are only recording two channels at a time.  To get more channels at a time, you are dipping into serious hardware.

Mixing it

Don’t ignore listening to it.  If your computer has built in speakers, they aren’t good enough.  You have the choice between good headphones or Good studio monitors. You need the good headphones anyway, so you can start with them, but studio monitors are much, much easier and better to mix to.   See my bit on Getting the Sound Out.

Getting the Sound Out

The goal in listening to your recording is to hear everything a little better than your target audience.  Cheap speakers or headphones will hide some flaw that someone else (even with cheap speakers or headphones) will hear clearly.

Headphones: Headphones are difficult to use in mixing. If you do use headphones get some really good ones – expect to pay over $100: Sony V6, AKG K240 (I use AKG K141 which is less money). You have a choice between open back headphones and closed back headphones.  Open back are often easier to build and make sound good, but closed back block out noise in a live sound environment. The AKG headphones are open back and will allow outside sounds to come in to the headphones. The Sony are closed back allowing you to listen to the track rather than the band.

Studio Monitors: Unfortunately most inexpensive studio monitors sound terrible.

Listen to some really nice studio monitors that are set up correctly. Take music that you know that is more than just “thump, thump, thump.” Specifically get male and female vocals and acoustic instruments. First listen to the monitors you can’t afford (one of my favorites is the JBL LSR 6328) and then pick the ones you can afford that sound as close to them as possible. If you can’t afford something that sounds decent – stick to headphones and save your money. You can always test out your mixes on your friends home stereo.

Monitor Placement: Most studio monitors are built to be operated without reflections. This means avoid room corners, walls behind the speakers but most importantly avoid reflective surfaces like desk tops or mixing console tops in front of the speakers. You do this by lifting the speakers above the desk and as close to the front edge as possible to still get proper aim. The interference (cancellation) caused by multi-path bouncing off a desk top is non-linear and no amount of EQ can fix it.

The center of the speaker should be at ear level or just below and they should be pointed directly at your head from a distance of about 3-5 feet.

Why Is There No Sound?

You get behind the board, turn up the volume, and nothing happens.

All the lights are on – what’s wrong?

In order – something is unplugged, turned off, or a battery is dead. Usually broken or faulty cables cause bad noises before they quit altogether.

First – use your headphones and listen to the channel. Check master channel gain, mute, signal routing, group gain and board gain to make sure it’s not something on the board. Then start at either the source (instrument/microphone) or destination (speaker) and trace the signal path. If the cables are connected all the way to the equipment then check to see if the equipment is on (yes this still happens to me).

Microphone/Instrument: 
Does the microphone have a switch? Wireless mics often have a power switch and a mute switch – both must be on and the battery must be good.

Is the microphone a condenser mic? If so it needs phantom power (or a battery).  Make sure you mute the channel before turning on or off phantom power or change a cable. The loud pop can hurt ears and destroy equipment.

Are there active direct boxes in the line? Many direct boxes have a preamp built in and either use phantom power or a battery (label these so people know it). Many guitars and basses have batteries as well though usually the musician is used to dead batteries and will try that right away.

If all this fails start looking at peripheral equipment. Usually it is all turned on at the same time as the mixing console, but an effects box or compressor can interrupt a signal. If it is unplugged or turned off it might stop the signal.

Try a different channel on the board. I have seen bad channels but they are rare.

Try a different mic/instrument. I have only once seen a standard wired mic die. Of course it quit during a live show and I had to wait for a break to replace it.